Difference between revisions of "Automating the Windows Home Server Shared Folder Backup"
(New page: =Automating the Windows Home Server Shared Folder Backup= With the release of PowerPack 1, Microsoft introduced the option of backing up the servers shared folder to a new type of drive o...) |
(→Automating the Windows Home Server Shared Folder Backup) |
||
| Line 23: | Line 23: | ||
| − | + | [[Image:Ahkey1.jpg]] | |
| − | + | ||
| − | Image | + | |
| − | + | ||
| − | + | ||
| Line 38: | Line 34: | ||
*Click the Backup Now button | *Click the Backup Now button | ||
*Click Hide | *Click Hide | ||
| − | |||
| − | Image | + | [[Image:Ahkey2.jpg]] |
| − | + | ||
| − | + | ||
*Now click Stop | *Now click Stop | ||
You will now be presented with the finished macro. | You will now be presented with the finished macro. | ||
| − | + | [[Image:Ahkey3.jpg]] | |
| − | + | ||
| − | Image | + | |
| − | + | ||
| − | + | ||
*Click Save | *Click Save | ||
Revision as of 10:52, 3 January 2009
With the release of PowerPack 1, Microsoft introduced the option of backing up the servers shared folder to a new type of drive option, a “Server Backup Hard Drive”. Unfortunately, they choose not to allow this option to be scheduled, a source of frustration for many Home Server users.
By using freely available mouse/keyboard macro software, it is possible to automate this process so that your backups are completed on a schedule. For this guide, we will be downloading and installing a free, open-source utility called AutoHotKey.
This software allows the mouse and keyboard strokes to be recorded, and then using Windows Task Scheduler, we can then replay the macro and ensure are backups are scheduled.
Download AutoHotKey - http://www.autohotkey.com/download/ and save it to \\HPSERVER\Software
- Remote Desktop onto the server, and click Start, Run and now type \\HPSERVER\Software and OK.
- Drag AutoHotKeyInstall.exe onto your desktop
- Right click on AutoHotKeyInstall.exe and choose properties, then Unblock.
- Double click on AutoHotKeyInstall.exe and accept the default setup options.
Now that setup is completed, we need to ensure that the Server Backup is configured, you can follow the Wiki links if you need to help Adding a Server Backup Hard Drive, or how to Backup your Home Server. The important part here is to ensure that the "Remember these settings for future backups" setting is ticked. Once that has been done, you can now record your macro.
You should now close all open apps and folders running in your RDP environment, including the WHS Console.
- Click Start, All Programs, AutoHotKey, AutoScriptWriter (Recorder)
- Click the Browse button, and navigate to C:\Program Files\Windows Home Server\HomeServerConsole.exe
- Click Record
After a short delay, the Windows Home Server console screen will open.
- Click on Computers & Backup
- Right Click on your Server and choose Backup Now
- Click the Backup Now button
- Click Hide
- Now click Stop
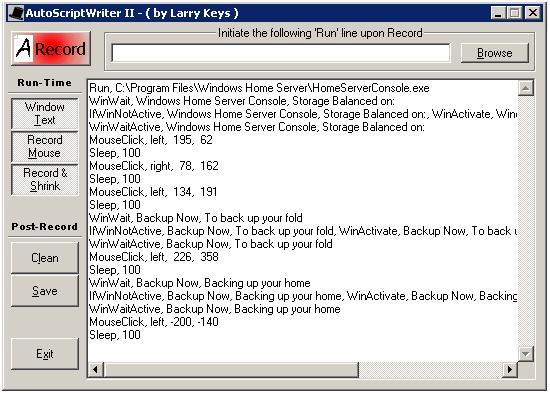
You will now be presented with the finished macro.
- Click Save
- Navigate to c:\
- Make a folder called Admin
- Save the file there as Backup_Server
- Click Exit
- Now test the macro, close down the Windows Home Server Console
- Click Start, Run
- Click on Browse
- Navigate to c:\admin
- Ensure Files of type is set to All Files
- Click on Backup_Server.ahk and click Open.
- The macro should now run, and the Windows Home Server console should open, and if everything has gone as it should, the backup should start.
- Now all that remains is to create a scheduled task to run this as you decide.


