Nearly two years ago (wow how fast time has flied by!) I wrote an article about the D-Link DAP-1522, a device that would allow you to either extend your wireless network via Access Point mode or serve as a wireless bridge to connect various networked devices (up to 4). Since I wrote that article I added another DAP-1522 into my home environment to better help with wireless coverage, especially since more and more mobile devices are being used. To date, both devices continue to work in Access Point mode without issue. A few days ago we were moving around some of the equipment in my house and I decided that I wanted to add another Access Point. Instead of going with the DAP-1522 I decided to go with the newly released DAP-1525. Let’s take a closer look at, and see if D-Link has made any improvements in the setup process (which caused a lot of headaches with the DAP-1522 such that I needed to write a guide about setting up!).
Specs:
The Amplifi Access Point/Media Bridge® (also known as Wi-Fi Booster) uses SmartBeam technology to replace and upgrade your existing 802.11g or Draft N router’s wireless signal. SmartBeam works by finding and tracking your wireless devices, then focuses beams of bandwidth to those devices, ensuring a seamless connection anywhere in the home. It has the capacity to deliver HD video streams and online gaming applications to ALL your connected devices, all at once, without annoying glitches or lags. Just plug the Access Point/MediaBridge into your router and SmartBeam will take care of the rest.
Features:
- Replace and upgrade an existing wireless 802.11g or Draft N network
- 6 element beam-forming antenna
- Selectable 2.4 GHz or 5 GHz band
- 4 high-performance Gigabit Ethernet ports
- SharePort™ Plus Technology for sharing USB 2.0 devices
- Price – $159.99 (I purchased from Amazon.com @ $109)

On the back of the DAP-1525 (sorry, forgot to take a photo) is a USB 2.0 port for sharing attached storage, a switch to choose either bridge mode or access point mode (2.4 or 5Ghz, cannot do both simultaneously), and four gigE ports.

Here is a quick comparison pic of the DAP-1525 side by side with the DAP-1522.

Setup:
Now for the real question, can I set up the DAP-1525 without having to mess around with the NIC settings in my PC… Well, let’s take a closer look.
1. After powering up the DAP-1525, using a networking cable (Cat5 or Cat6) connect the DAP-1525 directly to your PC (I am using Windows 7). Since I want to use the Access Point mode on the back of the DAP-1525, I set it to “AP 2.4GHz”
2. Once connected open up your PC browser and go to the following address: http://mydlinkap which will take you to the login screen for the DAP-1525. To log in the default user name is “admin” and the password should be left blank.

3. Once logged in you will be taken to the setup screen. Click the “Launch Wireless Setup Wizard” button to begin the process.

4. A message will appear giving you a little more detail on what the wizard is for. Click “Next” to proceed or “Cancel” if you are scared about what lies ahead!

5. There are two options for setting up. The first is via WPS (Wi-Fi Protected Setup), which you can use if you have other devices in your house that are already setup via the same method. I decided to go with the manual option since I would rather have a little more control over the process.

6. Going with the manual setup, you will be asked to assign a Network Name (SSID) and Network Key (not mandatory but highly recommended). With the SSID you can simply choose the same name as other wi fi devices in your house (this is what I do) or assign a unique name.

7. Once the SSID and optional Network Key are set up, you will get a confirmation screen with the details. Click “Save” and that is it, the DAP-1525 should be all set up :).

8. As a final step, now that the DAP-1525 is set up unplug the DAP-1525 from your PC and instead connect it to your network via network cable (once again, I am running AP mode). After a few seconds you should see the AP/Wireless led light up on the DAP-1525, and the network signal should now be transmitted wirelessly for any wireless device in your house to connect to.
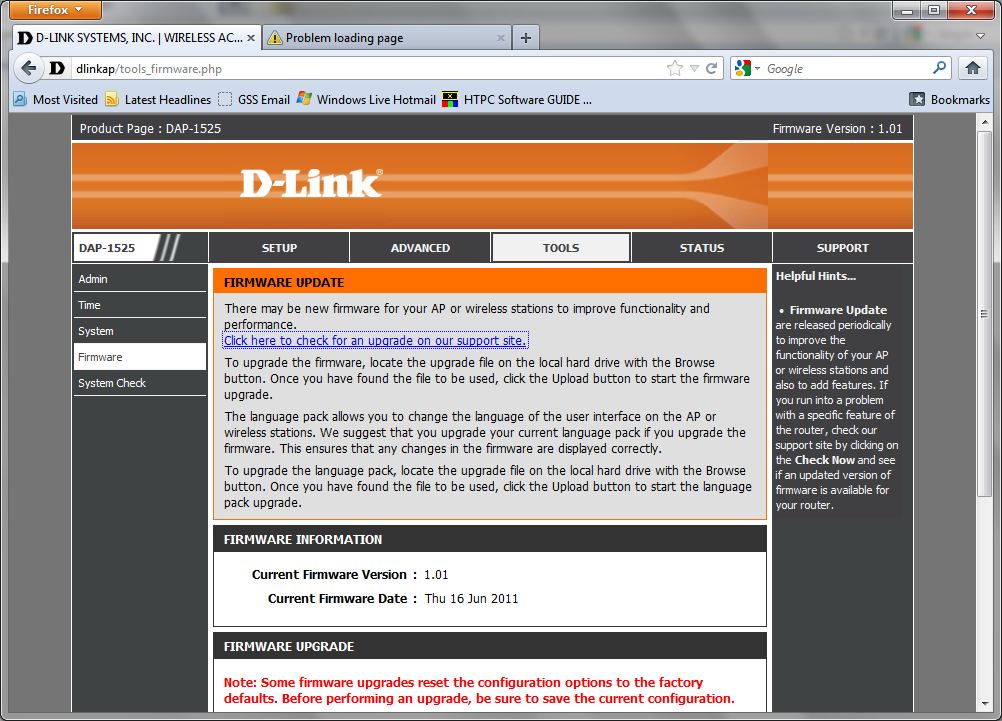
One additional item worth pointing out. Under the Status tab I noticed that the firmware on the DAP-1525 was from 16 Jun 2011, nearly 1 year ago.

To make sure I was running the latest firmware I decided to head over to the D-Link support site and check if any later firmware updates had been released. Sure enough, there was a newer firmware released on 04 Apr 2012.

All that needs to be done now is to download the new firmware to your PC. In your browser go to Tools -> Firmware, and under the Firmware Upgrade section browse to the downloaded file and click “Upload” (note, you may lose your settings so you may have to redo the setup wizard after the upgrade is done, or simply save your current settings to upload back once complete). That’s it, the DAP-1525 should now be running the latest firmware.

Keep in mind, any time you want to access the settings of the DAP-1525 you will need to reconnect it to a PC. Once you connect it to your network you will no longer have access to the settings (at least when in AP mode, I did not test Bridge mode).
Final Thoughts:
Well, I am happy to report that setting up the DAP-1525 was a breeze compared to the DAP-1522 (which took hours of researching on the forums and messing around with before I got it working the first time). I have only been running the DAP-1525 for a few days now, but the signal is very strong and the range seems to be very good. Given that the DAP-1522 costs approximately $90 on Amazon, I think it is worth spending the extra $20 to get newer hardware with the DAP-1525. As a bonus, the green led on the DAP-1525 is much less “in your face” compared to the bright blue leds on the DAP-1522.
Article by Damian
Hi, my name is Damian, and I'm tech gadget addict! Although I always had some interest in technology, it wasn't until I got my EX470 and more importantly found Mediasmartserver.net, that my interest became an addiction. My goal, aside from world domination and to see the Mets/Broncos win another championship, is to set up the perfect digital home where all my media is available at the click of a button. When I am not writing for Mediasmartserver.net you can find me over at my blog at http://www.adigitalhomeblog.com or follow me on twitter
{ 11 comments }
Have you tried this yet in BRIDGE mode?
I am beginning to think about extending a network where I can NOT get a wired connection but can get a wireless signal. Thoughts?
Hey John,
As of yet I have not tried Bridge mode since the areas in my house where I need a wired connection I have no issues getting.
Given how well these devices have worked for me in AP mode I would expect that as long as the wireless signal was string enough and you aren’t looking to do a lot of high bitrate transfers/streaming via, Bridge mode should work as expected.
Does this get fast speeds like the DAp1522 units. I use eight of them(four in AP mode and four in bridge mode) And have been extremely happy with them and the speeds I’ve been getting.
Speeds have been great so far, but most of what I do with these is internet browsing on my tablets. I did test the wireless connection using my laptop to this AP and actually had no issues streaming HD content (I was about 5 feet away from the AP) for the few minutes I tested.
I just noticed how you mention that you have to connect it to a PC again to change the settings. That is a major fail. With my DAP1522 units, all I had to do was connect to a PC initially, access with it’s default IP and then setup a static IP for my network. Then I could easily access it, whether in Bridge mode or AP mode, from a web browser from any device on the network. I really like the way the DAP1522 units are setup. I guess I can’t consider these. They took a major step backwards.
I never set up a static IP for it (never did it for my 2 DAP1522s either), so it could very well be that you could access the DAP-1525 in the same manner (and I would be surprised if you couldn’t since it worked with the 1522).
But thanks for the review? You always do a great job with them. Any chance you will be reviewing any of the new WD routers that just came out?
Not sure if I would look at them. TBH for routers I would rather stick with the folks that have been in the market for a while now (Cisco, D-Link, Netgear…). Funny enough my house is a mix of manufacturers (Cisco router, Dlink/HP ProCurve switches, and D Link APs).
Would connecting the access point via a power line adapter work as my house is not wired throughout to place this unit in another room or floor. I do need to boost my signal in several locations.
It would not matter. If using as an Access Point you just need to have a wired connection at the access point (whether it be powerline, MoCA, Cat, etc…)
Just in case someone trips over this post by search, I’d like chime in with “not such a breeze” experience. Mine appeared to be unreachable via any ‘url’, ip address and no amount of tinkering would get it to be accessible. I set up a wired ethernet connection between only my computer & the drink, and they simply would not talk.