If you record TV shows in Windows Media Center there is a neat little tool called MCEBuddy that will take your recordings, scan/remove commercials, and convert to an alternative format (such as avi or mp4). MCEBuddy has been around for a few years now and with the arrival of WTV/H.264 the developer began work on MCEBuddy 2.0. The project is developed by one person (Derek) so it has been slow going based on when he has free time (The MCEBuddy 2.0 project began in early 2010), and since MCEBuddy 2.0 betas have been command line tools I haven’t bothered to spend much time with.
In January 2011 MCEBuddy 2.0 Beta 13 was released, which was the first stab at a GUI based MCEBuddy 2.0. It is a very basic UI that simply gives you two profiles to encode to (H.264 and DIVX). I have been testing periodically and for the most part it has worked well with my WTV recordings. The only downside is that since the GUI is in its early stages there is no control over the profiles you can use, or at least I thought. I use the H.264 profile since I prefer to encode to H.264 mp4s (gives me flexibility with mobile devices). The problem is the H.264 profile does very little compression, so a 30 minute HD WTV recording (which are usually around the 2.5-3GB range) would turn in to an approximate 2GB H.264 mp4, a much larger filesize then I would like as well as taking much longer to encode (nearly 2+ hours on my PC). To get around this I would take the MCEBuddy created mp4 and run it through the Handbrake using the Universal preset, which would get me an mp4 closer to 200-300MB. This is a few too many steps for my taste though, and the whole process would take nearly 3 hours for a 30 minute show.
Since MCEBuddy uses Handbrake for its H.264 encoding, if I could just adjust the current profile to the Universal profile I use in Handbrake then I could get rid of the extra steps (and save myself a good two hours). Well, digging through the MCEBuddy Program Files folder I did locate the file where the profiles are store. Heading over to the Handbrake website I found their Universal Preset command line code which I copied in place of the default MCEBuddy H.264 profile, and voila, MCEBuddy created a 250MB H.264 mp4 in under 40 minutes! Here are the steps I did to make the change.
Step 1:
Download and install MCEBuddy 2.0 Beta 13 here (also called MCEBuddy 2.0 Reloaded). This beta is an x32 build so it may or may not work on x64 systems
Step 2:
Go to C:\Program Files\MCEBuddy2Beta\Config and make a backup of the profiles.conf file. After that is done open up the profiles.conf file for editing (I use NotePad ++). Under [X264] if you look at line 4 this is the video profile for handbrake.
handbrake-video=-e x264 -x cabac=0:ref=2:me=umh:bframes=0:8x8dct=0:trellis=0:subq=6:weightb=0 -f mp4 -O -I -q 20
Since I wanted to use the Handbrake Universal Preset (you can find here as well as other presets) I changed the video profile to match the Universal Preset.
handbrake-video=-e x264 -X 720 –loose-anamorphic -m -x cabac=0:ref=2:me=umh:bframes=0:weightp=0:8x8dct=0:trellis=0:subme=6 -f mp4 -O -I -q 20
Step 3:
Run the MCEBuddy.BetaUI Application (located under the MCEBuddy2Beta folder) to launch the MCEBuddy UI. Point it to the WTV recording you want to process, make sure that the “x264″ profile is selected, and click the “Start” button. Grab a beer and a steak burrito, come back in 30 minutes (+/- depending on your PC)
Step 4:
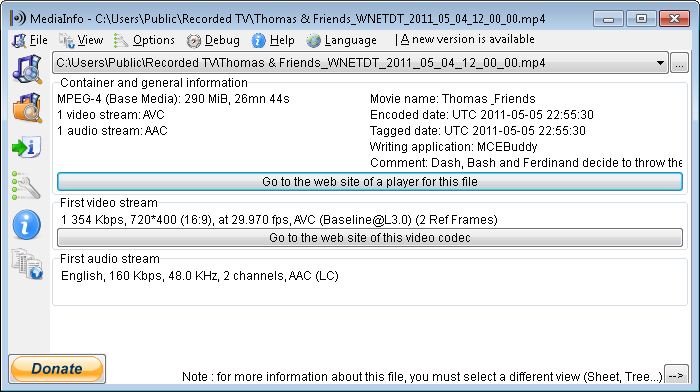
Once complete you should have a nicely compressed H.264 mp4 TV recording sans commercials ![]() When I was using the default x264 profile the converted mp4 file would be approx 2GB in size. Part of this as you can see from Media Info is due to the original resolution being kept as well as a much higher bitrate.
When I was using the default x264 profile the converted mp4 file would be approx 2GB in size. Part of this as you can see from Media Info is due to the original resolution being kept as well as a much higher bitrate.
With the Universal Preset the same mp4 was reduced to a 290MB file which is perfect for my mobile devices and still looks great on the TV.
Final Thoughts:
I have been testing MCEBuddy 2.0 Reloaded with the Universal Preset and so far it has accomplished exactly what I needed. Right now I am in the process of archiving shows for my sons (i.e. Super Why! and Thomas & Friends) which don’t have commercials during the shows (only commercials before and after), so I haven’t had a chance to test how accurate MCEBuddy is with commercial detection (by default MCEBuddy uses the free version of Comskip). It should be noted as well that if you want commercial detection/removal used on H.264 WTV recordings (I believe the HD PVR captures in this format) then you will need to have the paid version of Comskip or ShowAnalyzer installed on your PC. Also, see here for information on how to set up a TV Tuner such as the Hauppauge HDHomerun in Windows Media Center.


{ 1 trackback }